|
This week was pretty simple. It was just getting the second floor walls to Ryan, and so far they look awesome! I still have to subtract a lot of doorways and window holes, but I have about half of the floor done. Then, it will just be a matter of making the assets to fill the rooms. The textures and lighting Ryan has been adding has been making everything look really great. I'm really excited to see how the rest of the room turns out. I also have my meeting with Mr. B to do a progress check on what progress I have made towards this project, so that should be interesting. 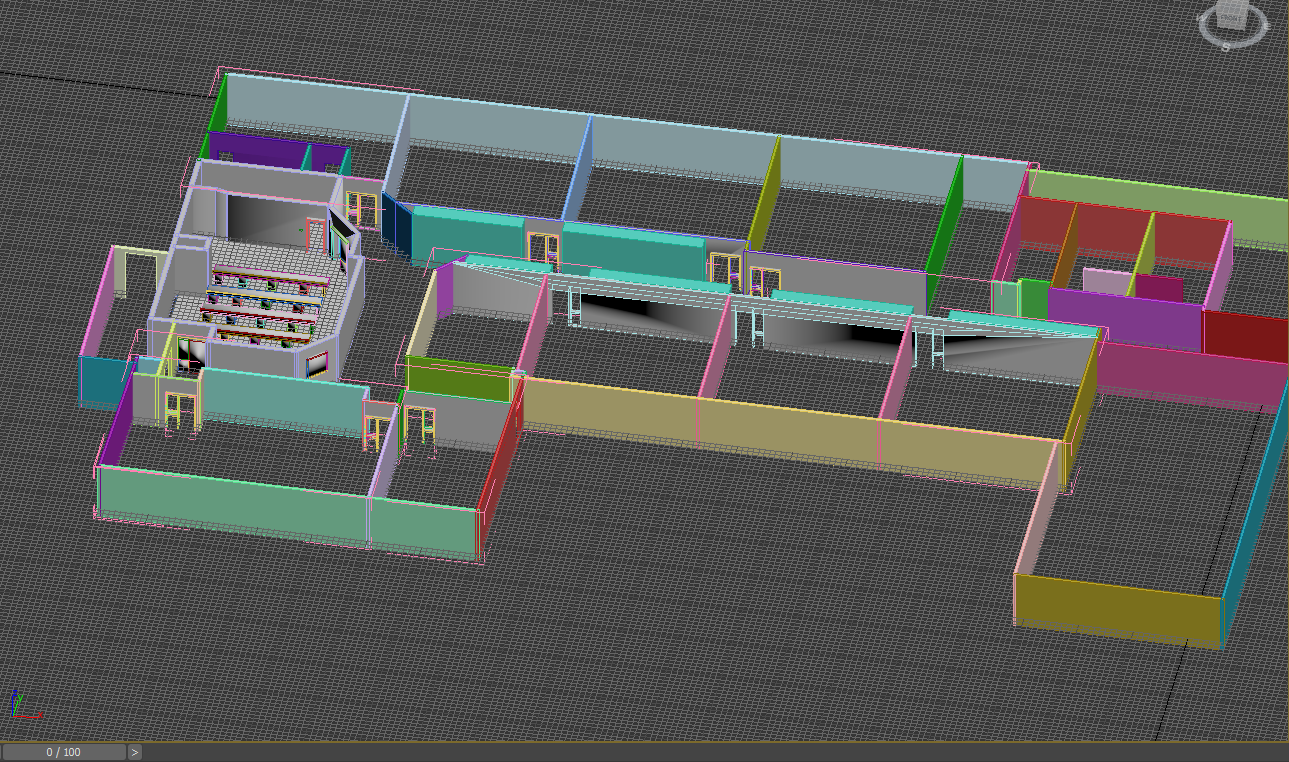 Goals for This Week:
0 Comments
This week was a continuation on revamping the GAD room, and also beginning to work on simplifying an enemy chicken model, modeled by Julia. I actually got a lot done this week, especially considering that I missed class on Wednesday. However, at the end of this upcoming week, we have a progress check so I do need to make sure that the GAD room is done (or close enough) so that we're ready for that. I started off by finishing subtracting the doorways and windows from the walls. I ran into a problem when I tried to export though because some of the vertices were problematic. However, switching from an .obj to a .fbx file easily solved this problem. There were a couple other issues with the pivots of some of the door frames, but Ryan was kind enough to fix this in Unity. I fixed a couple other pivot points for some assets as well, and then I took a break from the GAD room. Julia had just finished the chicken model, so I went about simplifying it. For the most part, it is much simpler than I would have guessed. However, there are quite a few tail feathers that I'm going to really try to remove some polys on. I got the feet of the chicken simplified this week and I think it will turn out great. I had to jump to yet another task, creating a texture for the counters in the GAD room. Last year, I tried to make one, and it was not good at all. It was supposed to be tileable but it there were enough discrepancies that you could easily tell it was tiled. This year, I literally just took a picture of the counter texture, and took the time to make sure it really was tileable. I'm hoping that nothing weird happens, but you never know with this project.  To Do This Week:
I guess we're just not allowed to have normal weather or normal weeks anymore. Anyways, I'm gonna keep this short.
This week was figuring out the issues we have with textures. I have to alter the GAD Room walls (by disconnecting them) in order for textures to work, which is tedious, but I'm glad I'm learning this before mapping out the entire 2nd floor of the building and making all of the walls connected, because that would be a lot to fix. The GAD room is really looking great thanks to Ryan adding in all of the textures and lighting. I'm excited to see Julia's chicken NPC put into the world, but that model needs to be greatly simplified. [No picture included due to a work week cut short and no pictures were taken] To Do This Week:
This week was very short for me since it only consisted of Monday and Tuesday. I did accomplish two things though. I mostly blocked out the upper floor of the main building! I still need to add stairs and doorways, but for the most part we have a template, which means Ryan can start coding the NPC walking patterns soon. I also learned that my "keyboard solution" involved 105 textures (what was I thinking last year when I made all of those textures???), which doesn't really help in terms of lag. I need to figure out how to avoid the "Screaming Keyboard" Problem (where each poly facing up is a different surface, but each is a tiny clone of the main one) and simply make a single texture surface that just has some gaps in it. This way I could at least UVW unwrap, because currently that only leads to the Screaming Keyboard problem again. 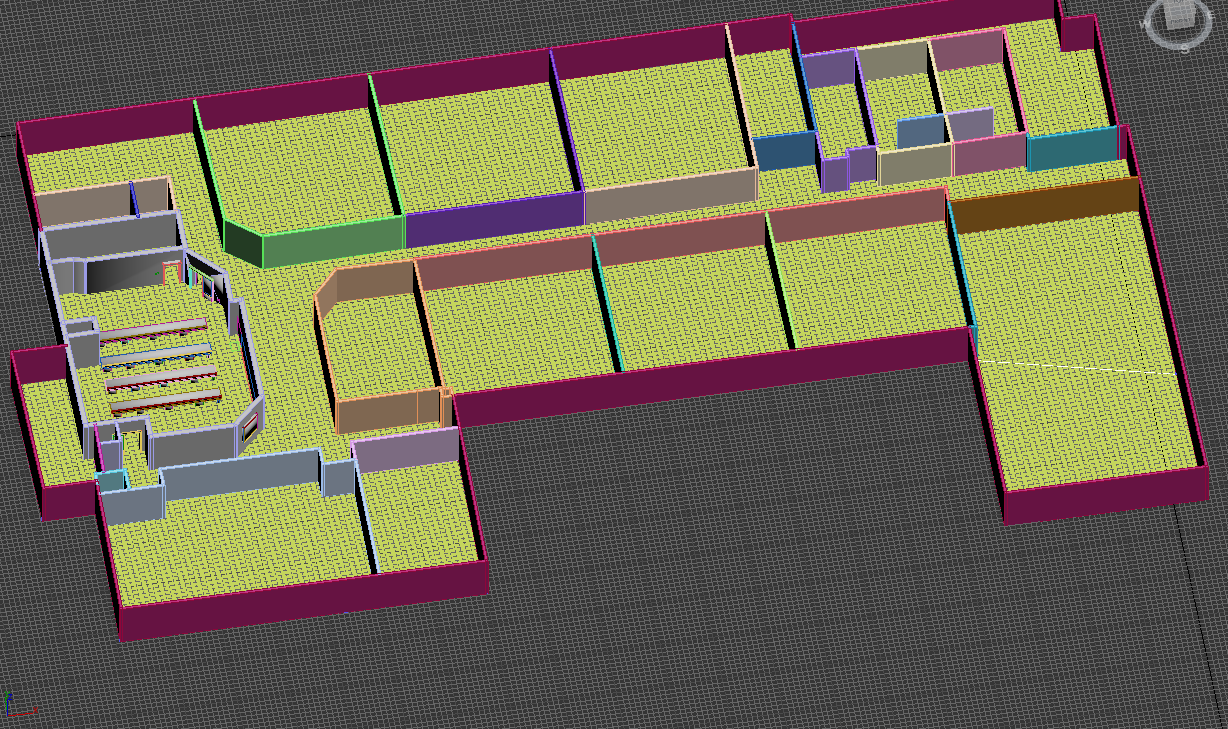 Goals for this Week
I got that GAD Room DONE! Finally! (But knock on wood because I'm sure now that I've said this, there will be 5 new problems with it). Most of this week was still removing polys, fixing doorways, and adjusting object pivots, but I was able to move on to modeling some of the upstairs New Building by the end. Fixing doorways actually taught me about boolean objects, something I had somehow never looked into in my almost 4 years of 3Ds Max. Incredibly useful and I definitely should have looked into them earlier. I got the GAD room down to just 536 KB (536,000 bytes), much less than the original 233 MB (233,000,000 bytes), meaning by removing individual objects that can be made from prefabs in Unity, and by taking out all of those polys, the room is about 1/4 of the size it originally was in terms of data. From this whole process from the GAD room, we established that assembling whole rooms in 3Ds Max is a mistake. Instead, make the different assets, and set them around the room in Unity. This way, prefabs could be used, or at least colliders/other object settings can be copied really easily if nothing else. 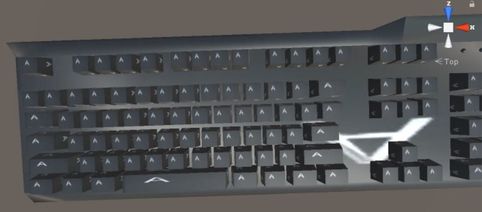 I call this one, the screaming keyboard. I call this one, the screaming keyboard. We did run into some issues with textures though, so it is my goal this weekend (today) to fix the keyboard's textures so that we can put that into the game. This keyboard has been the most complicated thing ever, and I'll be happy to have it working, even if it still is in a convoluted way with too many textures. Essentially, we initially had every key as its own object, and they were just all grouped together. That caused a ton of lag, so now a keyboard is just one complex object. However, this makes textures weird since the "box" has a ton of "top surfaces" that like to all be textured the same unless I explicitly go in and texture each of them individually. In the end, this will be worth it since I can just do this once -I already have done this in 3Ds Max but didn't know how to transfer textures to Unity at the time and have since lost the file - and then I can export it as an asset package, and hand it off to Ryan where he can easily copy it. Even though there will be 100 textures (not an exaggeration) it's the best way (currently) to avoid the issue pictured above, and each and every keyboard will reuse those same textures. I won't be surprised if I have to redo all of this again when we inevitably find a more efficient way, but for now, I'm doing what I can.
Goals for Next Week
This week was cut short due to hurricane Florence. As far as I know, not much damage was done around here, but school for Thursday and Friday was cancelled just to be safe. So, we only really had Monday through Wednesday, which is not a lot of time to get things done. I said in my last blog post that I hoped that "we are past any last year screw ups and can move on to this year's screw ups!" I should have followed this statement with "knock on wood," because I definitely jinxed it. The GAD Room model is RIDDLED with problems! Pivot points are miles across the screen! There are hundreds of unnecessary polys! There are doors without doorways in the wall! We sure didn't know what we were doing last year. So, that's what this week was. Working on fixing the GAD room, but I'm still not finished with it. It's gonna be a long week. [No picture included because the version of 3Ds Max we use at school is incompatible with the version I am able to get at home (I checked for updates, none available for my free student version) and since the week was cut short I did not get any pictures. Sorry.] Goals For Next Week:
This post is supposed to reflect on the process of design a game in VR. I don't have a lot to say about the actual designing of the game since most of the work I did was more about 3D modeling, so this will actually mostly reflect on that. Let's just say, this has been one of the most stressful projects of my life, I'm freaking out a little bit. Deadlines are very difficult to hit, and learning as you go only slows down the process. However, I feel like I have learned a lot and created decent work.
You can go to my selected works page, or even my VR DSA page in order to see what work I have actually done, but basically it was a lot of modeling of objects around the room. One of the main things I learned is every model needs to be as low-poly as possible. You'd be amazed at how many objects really are in a room, and how much lag it can cause. Moving into modelling the whole school, I definitely need to work on making lower-poly models, and learn a lot more about how textures and bump maps work. Though I have not seen the finished product yet, I am very proud of what we were able to accomplish in terms to making a VR model for the first time. I hope that the process will be a bit smoother next year because of all that we have learned as a group and with better scheduling and organization. It's been a while since I made a post about, or have even thought about VR, but next year (and for the rest of this year) that is going to be our main focus. I wanted to review what I have learned so far about VR/ things to remember, while also looking into any other tips that I can find.
First I'm going to recap what I learned at ECGC last year, which I made a blog post about a while ago. That post focused a lot on the specific features Unreal Engine 4 had, and unfortunately, our computers at school are probably unable to use this engine. However, my interview with Hurley did give me some more general tips for VR. For starters, keeping your frame rate high so as not to cause nausea. This shouldn't be a huge problem for us, but is something to keep in mind. On the same track of not making your player feel sick, we need to be careful in how we do movement. Sudden, uncontrolled movements, especially with non-steady accelerations can really make a player nauseous. The last thing Hurley said is very different about working in VR is the fact that there are two, oddly shaped screens, and your design now has to accommodate that, usually by using special meshes or slightly different rendering. Now to the new stuff. This article talks about getting into VR by experiencing it and just playing around. It also mentions giving the player a horizon line to look at to keep them from feeling sick, making sure everything is scaled correctly so that your player doesn't feel lost or claustrophobic, and it goes on in detail about designing a UI. It emphasizes not having your player have to do crazy things (ie look down to an uncomfortable angle) just to do basic interactions. Most of the interactions should be easy to achieve without putting stress on the player's spine or neck. The Unity website has some other things to say about VR as well. Basically, it's simple to set up a VR project in Unity. You have to do some extra set up at the beginning, but then it's just a matter of changing the product settings to enable VR. While earlier I said we probably didn't need to worry about frame rate that much, the website pointed out that since it has to render everything for both eyes, frame rate will likely decrease. It also says that if you have a VR camera in the scene, you can't move it alone. It has to be the child of another game object, and then you move the parents and the VR camera will come with it. It also unfortunately will not set up different cameras for different eyes, so you have to do that part yourself., but the website does give an example of how to do so. It suggests not using visual effects since they are often unrealistic and costly to rendering time. Overall, I'm glad that there don't seem to be many differences between VR in Unity and VR anywhere else, but since I haven't done VR anywhere else, I'm sure it's still going to take a lot of learning. The last project from class that we had to do was to make terrains within Unity by using tools already built into the program. I did not know that Unity had that capability, so I thought it was really cool. However, I'm sure there are many features to the terrain tool that I still did not even use, so I want to look into some of the other things it can do.
First, the things I know it can accomplish. The tutorial we used covered creating a terrain, editing the height map to create mountains and valleys and everything in between, as well as adding grass and water, and adding textures to the terrain. I also saw that there was a feature to add trees, but we never used this feature in the tutorial. Just by going to the Unity online manual I found an answer to one of the questions I had when going through the tutorial we used in class, which had been created in an older version of Unity. The tutorial talked about creating plateaus, but the method that they used would not work for me. The manual however shows that there is now a specified tool specifically for this purpose. Instead of setting a maximum height on the whole terrain as the tutorial said to, now next to the raise/lower height button, there's a new button, paint height. Here you can enter a target height that the terrain you are currently painting will not exceed. This is really cool because it means that you can make multiple flat areas at different heights more easily. The next page on the Unity manual is a little more interesting: trees. Trees differ from grass in that they are actual objects with colliders. The environments package comes with default trees but also makes it easy to create your own trees from within the program. Then, there's also a setting for tree density, making it easy to quickly place either just a few lone trees, or an entire forest. Unity is very nice in the way that it renders trees so that when you're further from them, it will use shortcuts to keep the program running smoothly (ie maybe making some distant trees appear more flat than 3D until you approach them, and not adding fancy effects like wind to them quite yet.) The tree page also mentioned something called "Windzones" which I noticed had its own page. These are interesting because they can either be components of an object or their own game objects. The manual does not seem to suggest any benefits to using one form over the other. However, they are very useful. This is what will make all of the trees on the terrain sway in the wind more realistically, but can also be used for smaller things, like an explosion that blows back the things around it. While I'm sure there are many other features to the terrain tool, I feel like I've already found a lot of new information, and will continue to learn more as I play around with this tool more often.
I wanted to learn more about arrays and summarize what I learned here. Arrays are extremely important and useful in almost any game in Unity, and I know I will need them for my independent project. I currently have very little understanding of them because most of the tutorials I've done lately have had that section automatically completed.
What I Already Know Arrays are ways to create a set of objects, names, numbers, or whatever else you want to put in a group. This is useful for spawning enemies randomly from different spawn points, or random encounters with different enemies that are all in an array together. You have to set up an array and define what is in it, but then from there you can use many different functions to choose random items from within it, or to act upon each of the objects in the group. However, I don't quite remember how all of this happens or the extent to which this can be used. What The Unity Scripting API Says It describes arrays as allowing you "to store multiple objects in a single variable". Arrays are indicated by the type of objects in the array followed by two square brackets - for instance GameObject[] enemies. Then we can use a foreach loop to do something to every game object in that group, such as instantiate all of them. This could be helpful for loading in levels. The only property an array has is length, or how many objects can fit in that array. You can also choose whether the array is serializable or nonserializable. This just means you can choose whether or not you'll see all of the items in the array in the inspector. There are also other methods to join arrays, remove items, shift the order of items, and add items. What I Learned From A Four Minute Video This video does a great job of explaining how arrays work. It shows two methods of putting items in your arrays. You can either, go one by one (ie array[0] = 1, array[1] = 5, array[2] = 17) or just list the items in order (ie {1, 5, 17}). It also explains the "i" or "iterator" variable, that I never quite understood. Basically this variable just acts as a stand in for the array's length so that then we can use foreach loops to do an action to each object in the array. Was This Worth Learning? Short answer: yes. I have a way better understanding of arrays now. However, I think I still have a lot to learn, but I also think that learning is going to have to come from trial and error as I code. However, this is going to make creating games with many enemies much easier. Summary
|
